- Where Should the Map Appear on the Checkout Page
- Map Instructions Text
- Default Coordinates
- Default Zoom
- Background Color (HEX)
- Checkout Page Map Height (in px)
- Checkout Page Map Width (in %)
- Order Received Page Map Height (in px)
- Order Received Page Map Width (in px)
- View Order Page Map Height (in px)
- View Order Page Map Width (in px)
- Store Locations
- Map ID
- Marker Icon
Where Should the Map Appear on the Checkout Page #
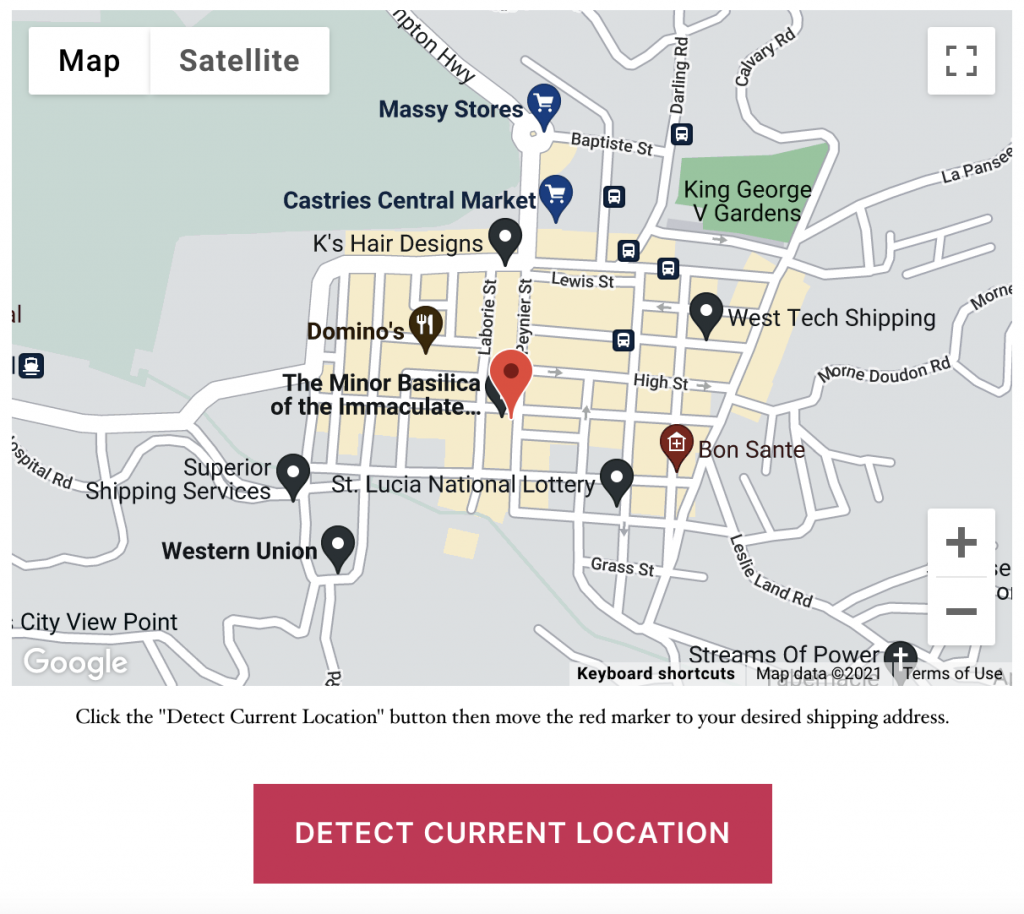
Kikote lets you choose between 4 different locations on the checkout page to inject the map. Choose the option which best suits your website.
Map Instructions Text #
The text that shows below the map on the checkout page. You can use this area to enter instructions for the customer.
Default Coordinates #
This option allows you to set the default view of the map. You can enter the coordinates for your city/country here if you want the map to always show your country when it loads.
Default Zoom #
This option allows you to set the zoom level of the default map view. It works hand in hand with the Default Coordinates option.
Background Color (HEX) #
This option allows you to set the background color of the map container. The map’s background color is usually visible for the first few seconds of the map loading or when a customer is selecting their location. Select a background color that blends in nicely with your website.
Checkout Page Map Height (in px) #
Set the height for the map on the checkout page. The number you enter in this field will be used as a pixels value. I.e 400 = 400px high.
Checkout Page Map Width (in %) #
Set the width for the map on the checkout page. The number you enter in this field will be used as a percentage. I.e 80 = 80% of the usable checkout page width. The number you enter here would depend on how your theme is handling the WooCommerce checkout fields, but 100 is usually the best value.
Order Received Page Map Height (in px) #
Set the height for the map that appears on the Order Received page. The number you enter in this field will be used as a pixels value.
Order Received Page Map Width (in px) #
Set the width for the map on the Order Received page. The number you enter in this field will be used as a percentage.
View Order Page Map Height (in px) #
Set the height for the map that appears on the View Order page. The number you enter in this field will be used as a pixels value.
View Order Page Map Width (in px) #
Set the width for the map on the View Order page. The number you enter in this field will be used as a percentage.
Store Locations #

Use this setting to set markers on the map that show your store location(s). This is useful if you’d like customers to know where your physical branches are located.
Enter Coordinate Pairs
Enter the latitude and longitude coordinates of the branch separated by a comma, example: 14.12102912,-61.12981212 if you have multiple branches, separate each coordinate pair with a | symbol like this: 14.12102912,-61.12981212|20.593683,78.962883
Store Location Labels
Enter the label to show for the store locations. If you entered multiple pairs of coordinates, enter their corresponding labels, each separated by a | symbol.
Store Location Icons (PRO)
Enter the URL for the marker icons you’d like to use. If you entered multiple coordinate pairs; be sure to add the marker links for each, if you do not add a marker link, then the default marker will show.
Map ID #
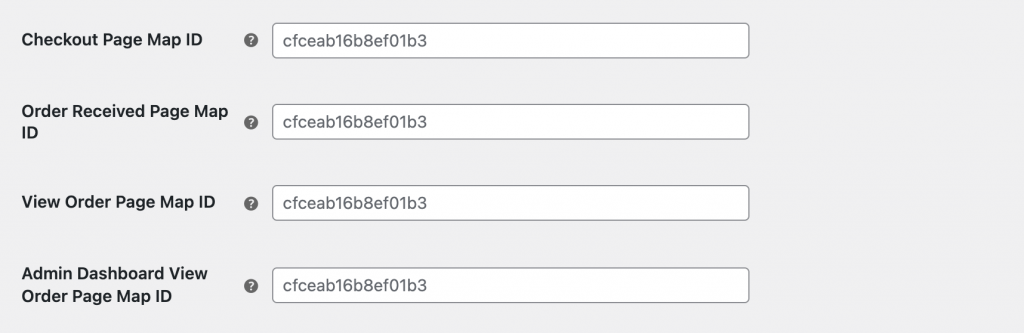
Enter the Map ID retrieved from Google. You can have different Map IDs for different maps on the website.
See the video below for steps on grabbing the JSON code needed for import into Google Cloud Console Maps Platform and retrieving the Map ID.
You can create custom maps or use those already created by other users on Snazzy Maps.
Note
You can create custom Map Styles directly on the Google Cloud Console Maps Platform. Snazzy Maps allows you to checkout other maps users have created and make use of those styles if you prefer them. You can always edit a map style if there’s something about it you don’t like.
Marker Icon #

Link to Icon
Enter the direct link to the icon to be used as the marker. This link should be publicly accessible and ideally should be a link to a marker image uploaded to your website.
Marker Anchor Points
Enter the anchor points to be used for the marker icon. This setting affects the “X” point which shows on the map when the marker is dragged. A good rule of thumb to use is the X value is usually half of the image width, the Y value is usually the image height + 3. So if you have a marker image which is 48px width by 48px height then an anchor point that might work for this image would be 24,52


